docker for windowsをインストールしてコンテナを使えるようにする。
インストラクションは下記にある。
https://docs.docker.com/docker-for-windows/
まずはインストールファイルをダウンロードする。インストールファイルはdocker storeからになる。
https://store.docker.com/editions/community/docker-ce-desktop-windows
ダウンロードするファイルサイズはおよそ500MBになる。
ダウンロードするためにはdocker storeにアカウントが必要である。アカウント作成はIDとメールを入力する。ちなみに無料。
ダウンロードしたインストールファイルをダブルクリックするとインストールが開始る。
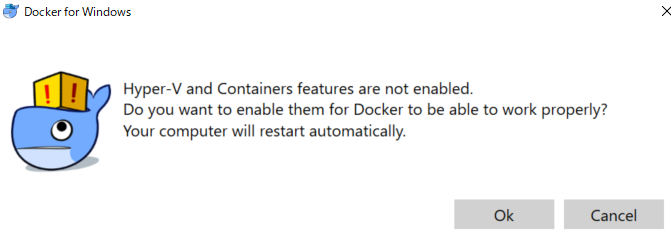
インストールが完了すると下記の画面が表示されることがある。Dockerが適切に動くためにはHyper-Vを有効にする。OKを押して再起動されるとHyper-Vが有効になる。
インストールが完了すると下記の画面が出てくる。
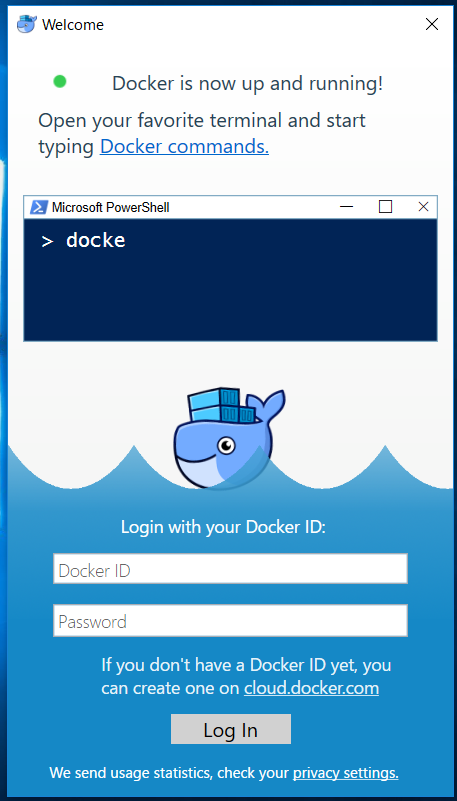
最初に作成したDocker IDとパスワードを入力してLog Inを押す。
これでDokcerを利用する準備は完了した
ここからコマンドラインを開いてDockerが正しく使えるかを確かめる。
まずはversionの確認
$ docker –version
Docker version 18.06.1-ce, build e68fc7a
次にhello-worldコンテナをDocker Hubから取得する。
$ docker run hello-world
Unable to find image ‘hello-world:latest’ locally
latest: Pulling from library/hello-world
d1725b59e92d: Pull complete
Digest: sha256:0add3ace90ecb4adbf7777e9aacf18357296e799f81cabc9fde470971e499788
Status: Downloaded newer image for hello-world:latestHello from Docker!
This message shows that your installation appears to be working correctly.
hello-worldイメージもうまくいった。ただしここまではあまり大したことはやっていない。ここからが本番である。
次にubuntuのイメージをダウンロードして、ubuntuのコマンド操作をする。
$ docker run –interactive –tty ubuntu bash
Unable to find image ‘ubuntu:latest’ locally
latest: Pulling from library/ubuntu
124c757242f8: Pull complete
9d866f8bde2a: Pull complete
fa3f2f277e67: Pull complete
398d32b153e8: Pull complete
afde35469481: Pull complete
Digest: sha256:de774a3145f7ca4f0bd144c7d4ffb2931e06634f11529653b23eba85aef8e378
Status: Downloaded newer image for ubuntu:latest
root@6cf37d8e5177:/#
最後のroot@6cf37d8e5177:/#に注目。この時点ですでにコマンドライン上でdockerで動いているubuntuに対してsshで接続している。
root@6cf37d8e5177:/# hostname
6cf37d8e5177
せっかくなのでコマンドをいくつか入力してみる。
root@6cf37d8e5177:/# ps -aef
UID PID PPID C STIME TTY TIME CMD
root 1 0 0 08:30 pts/0 00:00:00 bash
root 11 1 0 08:33 pts/0 00:00:00 ps -aef
利用できるコマンドは何があるのか
root@6cf37d8e5177:/# cd bin
root@6cf37d8e5177:/bin# ls
bash bzfgrep chgrp df false hostname mknod pidof run-parts sync uncompress zdiff znew
bunzip2 bzgrep chmod dir fgrep kill mktemp ps sed tar vdir zegrep
bzcat bzip2 chown dmesg findmnt ln more pwd sh tempfile wdctl zfgrep
bzcmp bzip2recover cp dnsdomainname grep login mount rbash sh.distrib touch which zforce
bzdiff bzless dash domainname gunzip ls mountpoint readlink sleep true ypdomainname zgrep
bzegrep bzmore date echo gzexe lsblk mv rm stty umount zcat zless
bzexe cat dd egrep gzip mkdir nisdomainname rmdir su uname zcmp zmore
